
Turn a simple printed word into a flowing script with easy, small steps that any beginner can try. Start by thickening downstrokes and keeping upstrokes light. Add gentle loops and connecting curves to make each letter flow together.
You don’t need the full alphabet to get a polished look. Linking four letters into a connected script gives a fast win and boosts confidence. An extra fine tip tool, such as an Artistro extra fine paint pen, helps control tiny flourishes on paper, cards, or smooth stones.
Try tiny hearts or subtle loops for personality without making the process hard. If you decorate kindness rocks, seal the final piece before placing it outdoors so your message lasts.
Explore creative projects and follow this guide for supplies, step-by-step letter formation, and simple practice options that lead to real results.
Key Takeaways
- Simple steps: Learn a clear method for turning print into connected script.
- Stroke contrast: Thick downstrokes and thin upstrokes create rhythm.
- Quick start: Four linked letters are enough to begin.
- Right tool: An extra fine tip pen gives control for small details.
- Low-cost embellishments: Tiny hearts add charm without extra work.
- Outdoor use: Seal rock lettering to protect it from weather.
What You’ll Learn About Writing “Love” in Cursive Today
Follow a clear progression from tracing printables to steady freehand strokes for best results.
Start by tracing the printed word on a thin sheet. Repeat the movement until the motion feels natural. This builds muscle memory and quick confidence.
You will see different style choices: long flowing lines finished with a heart, sharper modern scripts, and wreath-framed designs that place the word inside a circle of leaves. Some templates even use a heart as the “O” for a playful look.
“Tracing templates make the jump to freehand faster and less intimidating.”
Practical outcomes:
- Step-by-step connections that make the finished word look smooth.
- Clean entry and exit strokes for cards, tags, and décor.
- Guidance on picking a template that fits your project and mood.
The simple progression is trace, repeat until smooth, then write freehand on your final piece. Use printable templates for “love” and “loved” as practice guides, and check extra examples here: tracing printables.

Essential Supplies and Cursive Basics for Beginners
Begin with a steady pen and smooth paper, then build strokes one small step at a time.
Friendly tools to start: pens, paper, and even rocks
Gather basic gear: a smooth sheet of printer paper or cardstock, an extra-fine tip pen or paint pen like Artistro, and optional smooth rocks for outdoor projects.
Choose a pen that won’t feather so connectors stay crisp. For rocks, clean and dry the surface before letter work. Once dry, seal the piece for weather protection.
Thick downstrokes, thin upstrokes, and simple letter connections
Begin by writing words in simple print, then add small connecting curves between letters. Apply the key rule: darken downstrokes and keep upstrokes light.
Use gentle pressure on upstrokes and increase pressure on downstrokes. Practice making the left side of the “o,” the “v,” and the “e” slightly heavier where the stroke moves downward.

| Item | Why it helps | Best surface |
|---|---|---|
| Extra-fine tip pen (Artistro) | Control for small details and smooth curves | Paper, cardstock, smooth rocks |
| Printer paper / Cardstock | Affordable practice surface; shows feathering | Indoor practice |
| Smooth rocks | Durable project surface; fun for gifts | Seal after drying for outdoor use |
- Pick a pen that draws thin connectors and tiny hearts.
- Practice steady, consistent curves for even spacing.
- Seal rock work to keep the message outdoors safe.
How to spell love in cursive
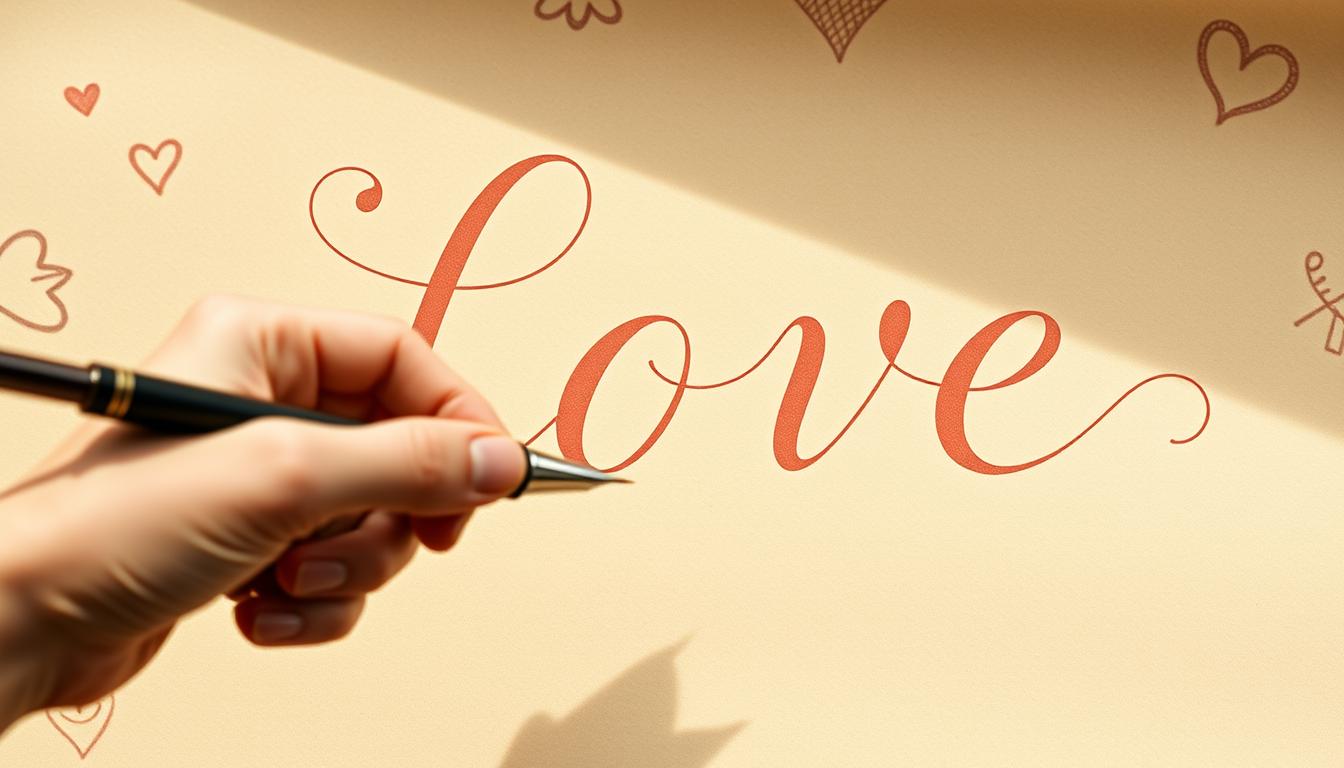
Begin by writing the word plainly, then refine strokes for a unified look. Start simple and add contrast: thin upstrokes and heavier downstrokes give motion and depth.
Form an elegant uppercase L by drawing a light entry stroke, curling into a tall loop, and descending with a controlled line you will thicken later. This initial letter sets the tone for the rest of the word.
Linking O, V, and E with smooth loops
Flow out of the L into an O by looping from the base. Make the left side of the O slightly darker to show the downstroke, then use a neat exit curve into a tapered V. Keep the V’s right stroke lighter, and move directly into an E that begins on the V’s exit.
Thicken downward lines and add hearts for flair
After sketching the base word, go back and thicken the downstrokes across each letter. Smooth the edges so added weight looks deliberate. Tiny hearts make an elegant final touch; try a small heart as a terminal flourish or dotted near the baseline.
“Trace bold variations like arrow-through or 3D heart styles first; repetition builds steady movement.”

| Step | Action | Tip |
|---|---|---|
| Uppercase L | Light entry, tall loop, controlled downstroke | Thicken after sketching for balance |
| O and V | Loop out of L, thicken left O, taper V valley | Keep right strokes thin for contrast |
| E and flourish | Start E from V exit, delicate cross-loop, finish with heart | Try arrow or 3D heart templates for variety |
For tracing guides and printable styles, see a helpful example at tracing templates. Keep your wrist relaxed and move from the shoulder for smooth, long curves.
Practice the word “love” with traceable printables and guides
Practice with traceable pages that guide each loop and connector until motion feels natural. Start by picking a template—classic flowing script, a modern sharp style, a 3D heart variant, or an arrow-through design.

Step-by-step tracing method:
- Print a template and place a thin sheet over it. Trace slowly to learn stroke order and pressure changes.
- Repeat the same template several times to train spacing, smooth curves, and thick-thin contrast across the letters.
- Use tick marks for baseline and x-height so each line stays even and balanced.
When to switch: Move to blank paper once tracing feels smooth and steady. Write slowly at first, then speed up only after your connectors stay clean.
Try outlining downstrokes in pencil, ink the heavier lines, then erase guides for a crisp finish. For rock projects, sketch light, ink with an extra-fine paint pen, let dry, then seal. For more printable options and practice guides, see traceable templates.
“Repetition builds muscle memory; small, steady reps beat occasional long sessions.”
Creative ways to use love in cursive in everyday life
A tiny hand-lettered word can change a plain card into something personal and warm. Use simple scripts on small paper goods and everyday objects to make them feel handcrafted.
Valentine’s cards and gift accents: Letter a flowing script on cards and add a tiny heart terminal for charm. Trace a 3D heart version for tags, trim the shape, and punch a hole for ribbon.
Quick notes and lunchbox surprises: Brighten someone’s day by slipping a short message with the word prominent and a small line like “You’ve got this!” beneath it. Keep a fine tip pen and blank tags handy for fast, heartfelt pieces.

Rock painting and sealing
For kindness rocks, sketch the letters lightly, ink with an extra-fine tip pen, add tiny hearts or decorative arrows, let the ink dry fully, then seal the surface before placing the rock outdoors. A sealed finish keeps your message readable and weather-resistant.
- Make budget wall art: letter the word on cardstock, add a leaf wreath, frame it.
- Personalize wrapping corners with an arrow-through baseline for a playful touch.
- Try a sharper, modern script for minimal, contemporary décor.
- Explore an arrow-through design or 3D heart printable for templates and practice.
“Small, thoughtful lettering turns ordinary items into keepsakes.”
Conclusion
A few short practice runs help the letters feel natural and keep your hand relaxed. Start from print, link letters with smooth loops, thicken downstrokes, and keep upstrokes light for steady results.
Trace printable styles like flowing, sharp, 3D heart, or arrow-through before freehand. Use an extra-fine tip pen for fine control on paper or rocks, then seal rock pieces for durability.
Remember the simplest path: print, trace, repeat, then write freehand. If you want extra practice guides, see this extra practice guide.
With small, regular sessions you will learn write the same short words with calm confidence and a steady rhythm.